Configure Remote Access: VPN Client-to-Site
Using VPN allows you to organize secure remote access of employees via the Internet to corporate services and data hosted in Selectel infrastructure. Using Selectel's FortiGate hardware firewall, you can set up remote access to organizations' private networks based on SSL, IPsec, and L2TP over IPsec technologies, using a variety of software installed on remote users' computers, laptops, and cell phones, such as:
- Fortinet's FortiClient client;
- a client from Cisco;
- through the operating system.
To create a VPN tunnel on the firewall requires that the firewalls already be configured:
- external interface through which the devices will be connected;
- internal network;
- Access to the FortiGate web interface.
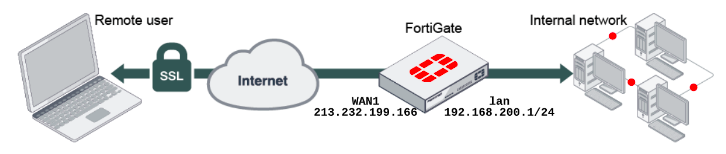
SSL-VPN Modes
-
Tunnel mode is the mode in which the SSL VPN client encrypts all traffic from the remote client computer and sends it to the FortiGate unit through the SSL VPN tunnel over an HTTPS link between the user and the FortiGate unit. Tunnel mode supports many protocols and applications. Tunnel mode requires a standalone SSL-VPN client, FortiClient, to connect to the FortiGate. FortiClient adds a virtual network adapter, designated fortissl, to the user's computer. This virtual adapter dynamically obtains an IP address from the FortiGate unit each time the FortiGate unit establishes a new VPN connection. Inside the tunnel, all traffic is encapsulated in SSL / TLS. The main advantage of tunnel mode over web mode is that once the VPN is installed, any IP network application running on the client can send traffic through the tunnel. The main disadvantage is that tunnel mode requires the installation of a VPN software client, which requires administrator privileges;
-
Web mode — a mode that provides network access using a web browser with built-in SSL encryption. Users authenticate to FortiGate's SSL VPN web panel, which provides access to network services and resources including HTTP / HTTPS, Telnet, FTP, SMB / CIFS, VNC, RDP and SSH. The Bookmarks section of the SSL-VPN portal page contains links to all or some of the resources that the user can access. The Quick Connection widget allows users to enter the URL or IP address of the server they want to connect to. The web-SSL-VPN user uses these two widgets to access the internal network. The main advantage of web mode is that it usually does not require additional software to be installed. This mode has the following limitations:
- all interaction with the intranet should be done exclusively using a browser (via the web portal). External network applications running on the user's computer cannot send data through the VPN;
- A secure HTTP / HTTPS gateway mechanism that does not work to access everything, but only a few popular protocols such as HTTP, FTP and Windows shares.
-
Split mode is a tunnel mode enabled tunnel mode that routes traffic only to the specified network through the FortiGate unit. When split tunneling is enabled, only traffic destined for the private network behind the remote FortiGate unit is routed through the tunnel. All other traffic is sent via the normal encrypted route;
-
Full mode — When split tunneling is disabled, all IP traffic generated by the client computer, including Internet traffic, is routed through the SSL-VPN tunnel to the FortiGate unit. This sets the FortiGate as the default gateway for the host. You can use this method to apply security features to traffic on these remote clients and to monitor or restrict Internet access. This increases latency and increases bandwidth utilization.
Configure SSL VPN
Create user groups
Users will be given remote access and will be able to utilize SSL VPN technology.
- Go to User & Authentication → User Definition → Create New.
- Create a local user, provide a username and password, and contact information if necessary.
- Merge the created users into a group.
- To create a user group, go to User & Authentication → User Groups → Create New.
- Specify the group name, Firewall type, and group members created previously.
Create SSL VPN tunnel
- Go to VPN → SSL-VPN Portal → Create New.
- Specify a name, enable Tunnel Mode.
- In the Source IP Pools field, specify the pool of addresses (IP Range) that will be assigned to remote users. You can add a pool created by the default SSLVPN_TUNNEL_ADDR1 or your own pool configured in the same way.
In the portal settings, you can also enable client checks, restrict certain OS versions, and set other client connection parameters.
Split mode
When split tunnel is created, traffic is routed only to the designated network.
- Activate Enable Split Tunneling.
- Select Routing Address to define the destination network that will be routed through the tunnel, meaning these addresses will be accessed by remote clients.
- Press + and select an address from the existing ones.
- To create an address, click Create in the pop-up window or in the Policy & Objects → Addresses → Create New field.
Full mode
If you want a full mode tunnel that allows all remote client traffic to pass through the FortiGate unit, you must disable Enable Split Tunneling.
Web mode
Another setting is the Enable Web Mode parameter, which allows you to enable web mode. Here's where you can choose:
- the name of the portal (Portal Message field);
- design;
- other settings.
Of most interest is the User Bookmarks field — the option allows users to create their own bookmarks. The Predefined Bookmarks field allows you to create bookmarks centrally for all users. For example, you can create a tab to connect to a remote desktop using the RDP protocol. This completes the configuration of the SSL Tunnel itself.
Configure general SSL VPN settings
- Go to VPN → SSL-VPN Settings.
- Specify the "listening" interface, that is, the external interface to which connections from remote users (wan1 in this example) will arrive, and the port on which they will connect. When a port is defined, it may be the same as others that are defined for administrative access. For example, the default is 443, which may conflict with the HTTPS port, and the FortiGate unit will display the following message:
- Set Restrict Access to Allow access from any hosts or, if you want to restrict access, click Limit access to specific hosts and grant access to specific hosts.
- Specify the period of inactivity after which the user will be forcibly disconnected from the VPN by enabling the Idle Logout parameter and defining a value in the Inactive For parameter, the default is 300 seconds.
- Select a certificate for the Server Certificate option. This certificate is used to authenticate and encrypt SSL VPN traffic. The default is the built-in Fortinet_Factory. It is possible to work with an embedded certificate, but users will see a warning that the certificate is invalid because there is no CA certificate in the certificate store that signed the current SSL certificate. It is recommended that you purchase a certificate for your server and download it for authentication.
Add a certificate for authentication
-
Go to System → Certificates.
-
Make sure that System → Feature Visibility has Certificates enabled.
-
Select Import → Local Certificate.
-
In the window that appears, set Type to Certificate.
-
Download the Certificate file and Key file for your certificate and enter the password in the Password field.
-
The server certificate will appear in the Certificates list.
-
Install a CA certificate, which is a certificate that signs both the server certificate and the user certificate, for example, to authenticate SSL VPN users. To do this, under System → Certificates select Import → CA Certificate.
-
In the window that appears, set Type — File and upload the certificate file.
-
The CA certificate will appear in the External CA Certificates list.
-
Configure PKI users and a user group to use certificate authentication by using the CLI to create PKI users:
config user peer
    edit pki01
        set ca CA_Cert_Name
        set subject User_Name
    next
end -
Make sure that the subject matches the username of the certificate. When you create a PKI user, a new menu is added to the GUI where you can continue with the settings.
-
Go to User & Authentication → PKI to highlight the new user.
-
Click Edit to edit the user account and set Two-factor authentication.
-
Make sure that this user is in the user group for the SSL VPN created earlier (see "SSL VPN User Group"). item Create a user group).
You can also check remote user certificates by enabling the Require Client Certificate option. Under Authentication/Portal Mapping, you must map the SSL portal to a user group. By default, all users have access to the same portals. This table allows you to map different portals to different user groups. Create a new record in the table by clicking Create New and defining the portal and user group. Once configured, click Apply and proceed to create the security policy.
Customize policy
In order for users to successfully connect to our VPN and have the necessary access, we need to create a policy that allows access from the ssl.root interface to the local network interface.
- Go to Policy & Objects → Firewall Policy → Create New.
- Specify the policy name, the inbound interface should be SSL-VPN tunnel interface(ssl.root).
- Select the outgoing interface, in this case it is the internal lan interface.
- In the Source field, select the previously created user group, in this case it is SSLVPNGROUP, and the address object all.
- In the Destination field, select the desired LAN.
- Specify the required services and save the policy.
Customize FortiClient
The FortiNet FortiClient is available for free download at official website. FortiClient is compatible with multiple platforms, with free SSL VPNs available on each. It is also possible for a customer to purchase a license that provides additional features and technical support. The usage and compatibility features can also be found on the official website under Technical Specification.
To configure the connection on the client:
- Go to REMOTE ACCESS and select SSL-VPN.
- Specify the connection name, the FortiGate IP address, and the port on which the client is connecting (configured in Secondary SSL VPN General Settings).
- If necessary, select certificates and authentication options (either prompt for login and password each time you connect, or save the login).
- Save this connection.
- Try connecting with the connection name, username, and password.
If the SSL portal previously had web mode enabled, you can connect using either a browser or a bookmark created without using FortiClient:
- Enter the address of your FortiGate and the port on which the connection is available in the address bar. in Secondary SSL VPN General Settings).
- Authorize by entering your user name and password.
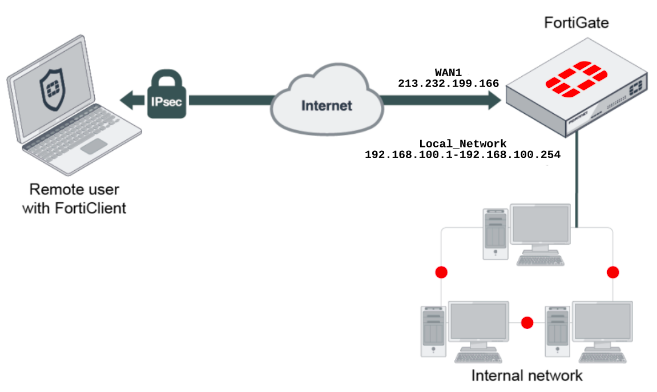
Configure IPSec VPN
Create user groups
To create a VPN tunnel over IPsec, you must create users who will be granted remote access and group them together.
- Go to User & Authentication → User Definition → Create New.
- Create a local user, provide a username and password, and contact information if necessary.
- Merge the created users into a group.
- To create a user group, go to User & Authentication → User Groups → Create New.
- Specify the group name, Firewall type, and group members created previously.
IPSec Wizard
To create the tunnel itself, you can use a special IPsec Wizard that provides the necessary configuration templates:
- Go to VPN → IPsec Wizard.
- In the VPN Setup step, enter a name for the tunnel.
- Select the Remote Access tunnel type and the Client-based and FortiClient remote device type, indicating that the FortiClient client is being used for the connection.
- Press the Next button.
- In the Authentication step, specify the incoming interface on which connections will be received (in this case it is wan1).
- Select the authentication type: Pre-shared key or certificate. In this case, a secret key is selected and its value is entered in the Pre-shared key parameter.
- Specify the previously created user group that will be granted access for connections.
- In the Policy & Routing step, specify the local interface in the drop-down menu to which remote clients will connect.
- In the Local Address parameter, specify the subnet to which users will have access. In this case, the address object all is selected.
- To select a specific subnet, press + and select an address from the existing subnets.
- To create an address, click Create in the pop-up window or in the Policy & Objects → Addresses → Create New field.
- In the Client Address Range field, specify the address pool that will be assigned to remote clients when they connect.
- Make sure that these addresses do not match the internal addressing. Leave the Subnet Mask at its default value.
- The DNS Server field allows you to select the DNS server that remote users will use when connecting to the tunnel. In this case, system is selected.
- The Enable Split Tunnel option allows you to allow users to access only specific subnets, rather than letting all of their traffic go through the FortiGate unit.
- The Allow Endpoint Registration option allows you to obtain various information about remote endpoints and make decisions based on this information (e.g. whether to allow a remote endpoint to connect or not).
- The Client Options step allows you to configure the client options: password saving, auto-connect, and continuous connection.
- After the performed actions, the tunnel is created and a summary of the objects created by the assistant appears on the screen.
Connect FortiClient
The FortiNet FortiClient is available for free download at official website. FortiClient is compatible with multiple platforms, each with a free SSL VPN available. It is also possible for a customer to purchase a license that provides additional features and technical support. The usage and compatibility features can also be found on the official website under Technical Specification.
To configure the connection on the client:
-
Go to REMOTE ACCESS and select IPsec VPN.
-
Specify the connection name, FortiGate IP address, and select an authentication method. In this case, Pre-shared key is selected and the secret key value is entered as previously configured.
-
In the Authentication field, select:
- The Prompt on login option so that FortiClient is prompted for a username and password each time it connects;
- the Save login option so that only the password is prompted each time you connect. In this case, you must enter a login in the Username field.
-
Save this connection.
After that, select the name of the saved connection, enter the user name created in step 1 and its password, and click Connect.
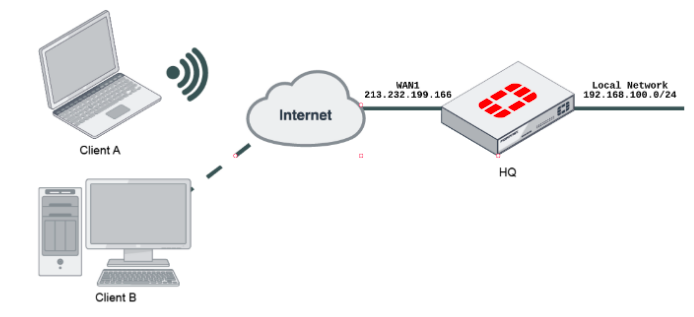
Configure L2TP over IPsec
Create user groups
To create a VPN tunnel over IPsec, you must create users who will be granted remote access and group them together.
- Go to User & Authentication → User Definition → Create New.
- Create a local user, provide a username and password, and contact information if necessary.
- Merge the created users into a group.
- To create a user group, go to User & Authentication → User Groups → Create New.
- Specify the group name, Firewall type, and group members created previously.
IPSec Wizard
To configure an L2TP tunnel over IPsec:
- Go to VPN → IPsec Wizard, to use the special assistant.
- Select the Remote Access template type.
- In the Remote Device Type parameter, Native and Windows Native.
- In the Name field, enter the name of the tunnel.
- Select as Incoming Interface the external interface through which remote users will connect. In this case, wan1.
- For Authentication Method, select Pre-shared Key and enter the value of the secret key in the field below. This key must be entered on the client when configuring the VPN connection.
- In the User Group parameter, enter user group created.
- In the Policy & Routing step, specify the local interface in the drop-down menu to which remote clients will connect.
- In the Local Address parameter, specify the subnet to which users will have access. In this case, the address object all is selected.
- To select a specific subnet, press + and select an address from the existing subnets.
- To create an address, click Create in the pop-up window or in the Policy & Objects → Addresses → Create New field.
- In the Client Address Range field, specify the address pool that will be assigned to remote clients when they connect.
- Make sure that these addresses do not match the internal addressing.
- Leave the Subnet Mask at its default value.
- Press the Create button.
After that, the tunnel will be created and a summary of the created objects will appear on the screen.
To set up a connection in Windows
- Go to Network and Sharing Center → Set up a new connection or network.
- In the window that appears, select the Connect to a workplace option, then → Use my Internet connection (VPN).
- In the Internet address field, enter the FortiGate unit's IP address.
- In the Destination name field, enter the name of the connection to be created.
- After that, the created connection will appear among the available networks.
- In the Network and Sharing Center window, click the Change adapter settings tab.
- Among the networks that appear, select the VPN connection you created.
- Right-click to select Properties.
- In the Properties window that appears, click the Security tab.
- In the Type of VPN parameter, select Layer 2 Tunneling Protocol with IPsec (L2TP/IPsec).
- Go to Advanced settings.
- Select the Use preshared for authentication option.
- In the Key field, enter the value of the secret key that you specified when configuring the tunnel on the FortiGate.
- Press the OK button to connect.
- Enter the username you created earlier and the password for it.